How to Replace Your Images and Media Files in WordPress
Are you wanting to replace media files and images on your site with new versions? You may know that uploading the same image again having the same filename doesn’t seem to have any effect – the image still looks like the original. It happens due to the WordPress image cache. In this tutorial, we will share how to replace your images and media files in WordPress.
It is recommended to use the Enable Media Replace plugin to update new image files on the previously uploaded photos. This plugin will not affect the meta information and update the changes made by you in the images.
To replace your images and media files in WordPress, you’ll need to follow these 4 steps:
- Step 1. Install and activate the Enable Media Replace plugin
- Step 2. Go to the Media Library in WordPress and change it to list-view
- Step 3. Use the Replace Media link below the image file names
- Step 4. Browse the new image file on your computer and update it
Ready to get started? Let’s go!
Step 1: Install and Activate the Enable Media Replace Plugin
The first thing you need to do is install and activate Enable Media Replace WordPress plugin.

You should check out this simple guide to learn how to install a plugin in WordPress.
Step 2: Go to the Media Library in WordPress and Change it to List-View
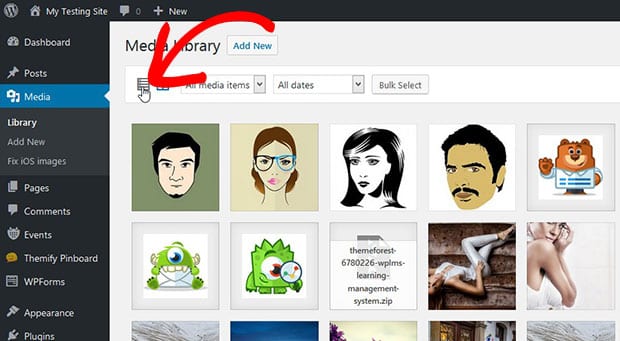
After activating the plugin, you need to go to Media » Library and click on the list-view icon.

The list-view displays the option to replace your media file in WordPress.
Step 3: Use the Replace Media Link Below the Image File Names
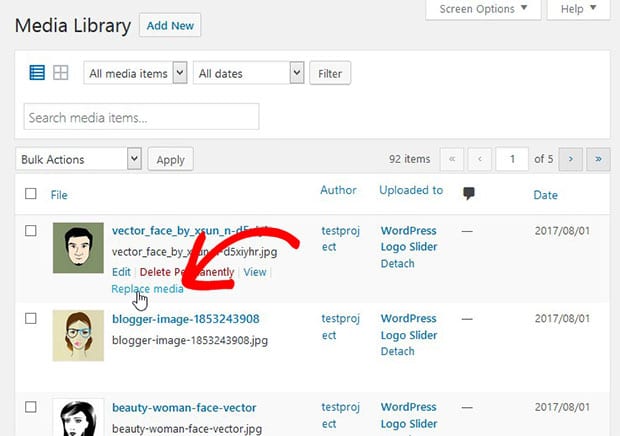
Once you switch to the list-view, you’ll see the option of Replace Media under each image with the other options.

Hit this replace media link. It will take you to a new page where you can replace the media file.
Step 4: Browse the New Image File on Your Computer and Update it
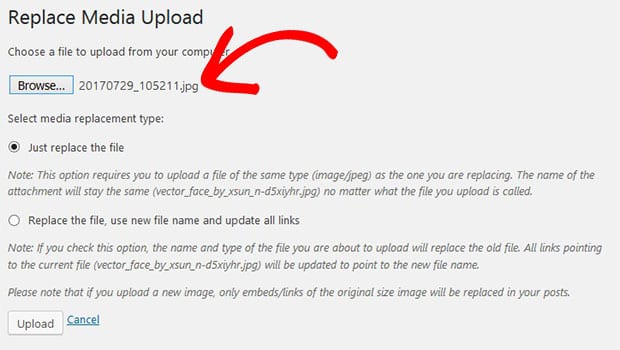
Simply click on the Browse button and choose the media file from your computer.

There are two options for you to either replace the media file or update the filename and links on your site. Once you choose your option, click on the Upload button.
You can repeat this process and replace as many images and media files as you need.
That’s all. We hope this tutorial has helped you to learn how to replace your images and media files in WordPress. You may also want to check out our guide on how to optimize WordPress slider images for fast loading. In case, your images are loading slow in WordPress, you should check this ultimate guide to boost speed and performance.
If you like this tutorial, then please follow us on Facebook and Twitter for more free WordPress guides and resources.


Barbi Atkinson
Hi Nigel 🙂 I’m very sorry for any trouble! I did just try to duplicate that using both options (to just replace the file and to replace the file and filename) and wasn’t able to get the same results. I suspect there may be something else going on here. But I am only using Soliloquy and a WordPress default theme with the plugins so perhaps that’s the difference? If any other media library plugins are enable or possibly a different server configuration that could’ve caused the issue. Again, I sincerely apologize for any trouble you had. If you would like to explore in more detail what could’ve happened, please feel free to reach out to support! 🙂